Fall is here, and it’s time to cozy up with some amazing nail designs that perfectly capture the essence of the season. From the warm hues of autumn leaves to the festive vibes of Halloween, there’s a lot to play with when it comes to nail art. But where do you start if you’re a beginner? And how can you create simple autumn nail designs that look professional? Let’s dive into some easy fall nail designs that you can try at home.
Metallic Silver Nails with Accents
There’s something incredibly chic about metallic nails, and this design takes it to another level with unique accents and text details. The high-shine silver polish catches the light beautifully, making your nails look like polished chrome. This look is perfect for anyone who loves a bit of edge in their style.

-
- Metallic silver nail polish (e.g., Sally Hansen Miracle Gel in “Game of Chromes”)
- Nail art stickers or decals with text
- Clear top coat (e.g., Seche Vite Dry Fast Top Coat)
- Nail glue for attaching 3D accents
Home Instructions:
-
- Start by applying a base coat to protect your nails.
- Apply two coats of metallic silver polish, allowing each coat to dry fully.
- Carefully place the text decals on the nails, smoothing out any bubbles.
- Add any 3D accents using nail glue.
- Finish with a clear top coat to seal everything in.
Bold Pink and Yellow Zigzag Nails
This design is all about making a statement. The vibrant pink base paired with striking yellow zigzag patterns creates a fun and eye-catching look. It’s ideal for those who love bright colors and bold patterns.

-
- Bright pink nail polish (e.g., OPI Nail Lacquer in “Pink Flamenco”)
- Yellow nail polish (e.g., China Glaze Nail Lacquer in “Happy Go Lucky”)
- Nail art brush or striping tape
- Matte top coat (e.g., Essie Matte About You)
Home Instructions:
-
- Apply a base coat to protect your nails.
- Paint all your nails with two coats of bright pink polish.
- Using a nail art brush or striping tape, create zigzag patterns with yellow polish.
- Once the design is dry, finish with a matte top coat for a sophisticated finish.
Cute Floral Pattern on Coral Base
Floral patterns are timeless, and this design brings a fresh twist with a coral base and contrasting flower details. It’s perfect for a subtle yet stylish autumn look.

-
- Coral nail polish (e.g., Essie Nail Polish in “Tart Deco”)
- White and black nail polish for detailing (e.g., Essie Nail Polish in “Blanc” and “Licorice”)
- Dotting tool or fine nail art brush
- Clear top coat
Home Instructions:
-
- Apply a base coat to your nails.
- Paint all your nails with coral polish, using two coats for full coverage.
- Use a dotting tool or fine brush to create floral patterns with white and black polish.
- Seal the design with a clear top coat for longevity.
Leopard Print Nails
Leopard print is a classic design that never goes out of style, especially in the fall. The bold black spots against a warm yellow base create a fierce and fashionable look that’s perfect for the season. This design is not only trendy but also surprisingly easy to achieve at home.

-
- Yellow nail polish (e.g., OPI Nail Lacquer in “Exotic Birds Do Not Tweet”)
- Black nail polish (e.g., Essie Nail Polish in “Licorice”)
- Nail art brush or dotting tool
- Clear top coat (e.g., Sally Hansen Insta-Dri Anti-Chip Top Coat)
Home Instructions:
-
- Begin with a base coat to protect your nails.
- Apply two coats of yellow polish and allow them to dry completely.
- Using a nail art brush or dotting tool, create irregular black spots on each nail.
- Add smaller dots around the black spots to mimic the natural leopard print.
- Seal the design with a clear top coat for a glossy finish.
Save Pin

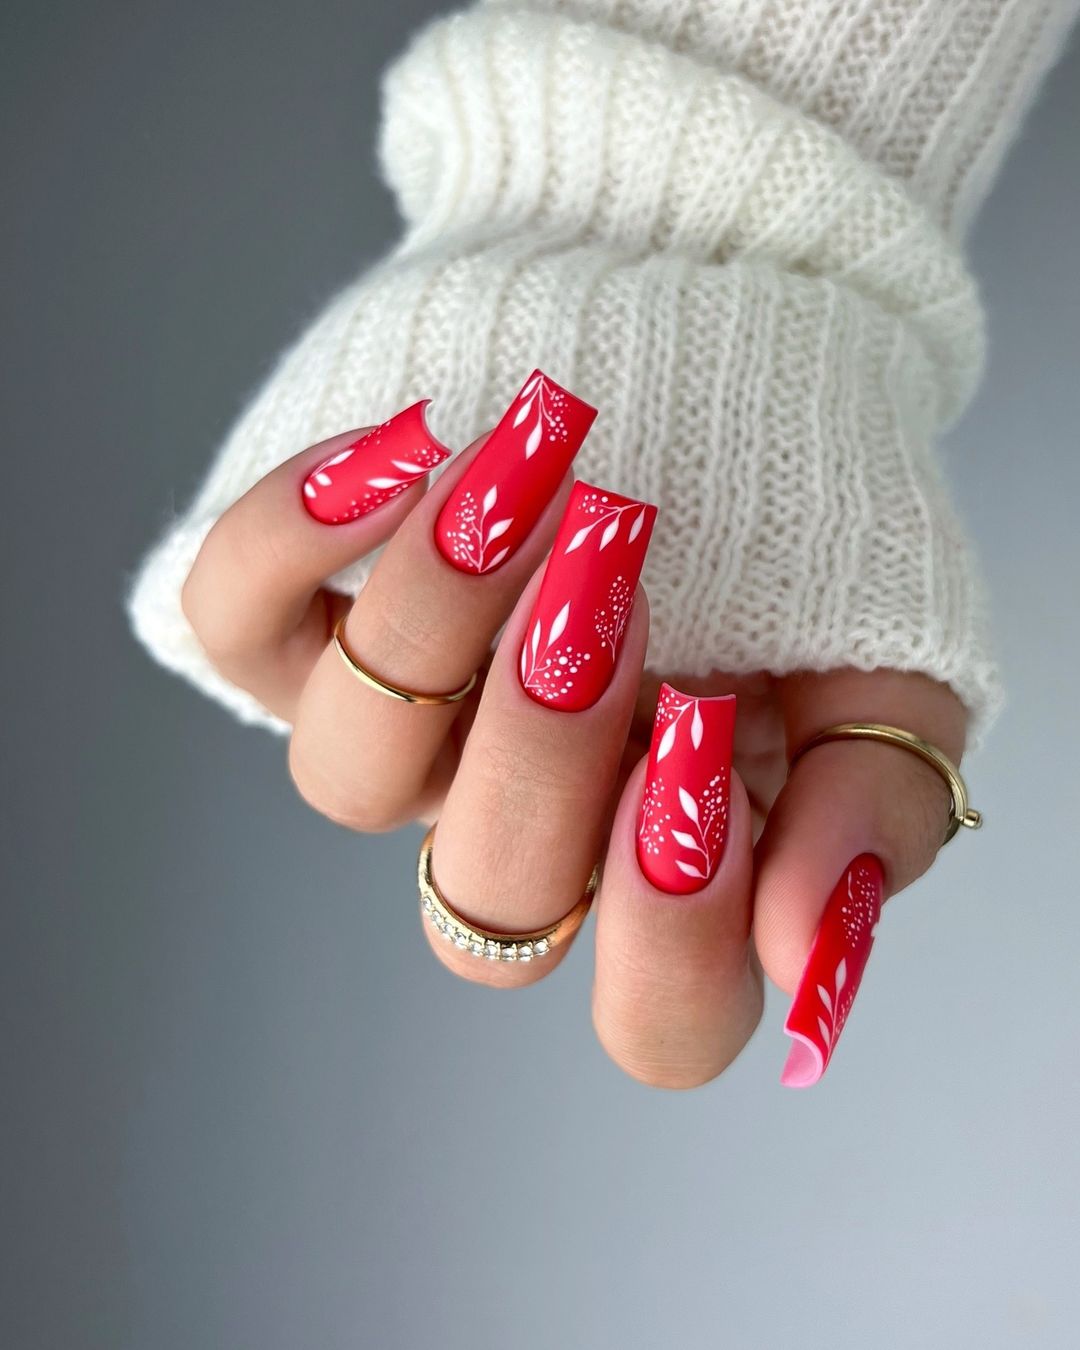
Red Nails with White Leaf Accents
This red and white nail design is a beautiful representation of autumn’s vibrant colors. The bright red base with delicate white leaf accents creates a sophisticated yet playful look that’s perfect for any occasion.
-
- Red nail polish (e.g., Essie Nail Polish in “Russian Roulette”)
- White nail polish (e.g., OPI Nail Lacquer in “Alpine Snow”)
- Fine nail art brush
- Clear top coat (e.g., CND Vinylux Weekly Top Coat)
Home Instructions:
-
- Apply a base coat to prepare your nails.
- Paint all your nails with two coats of red polish.
- Use a fine nail art brush to draw white leaf patterns on each nail.
- Allow the design to dry completely before adding a clear top coat to protect your artwork.
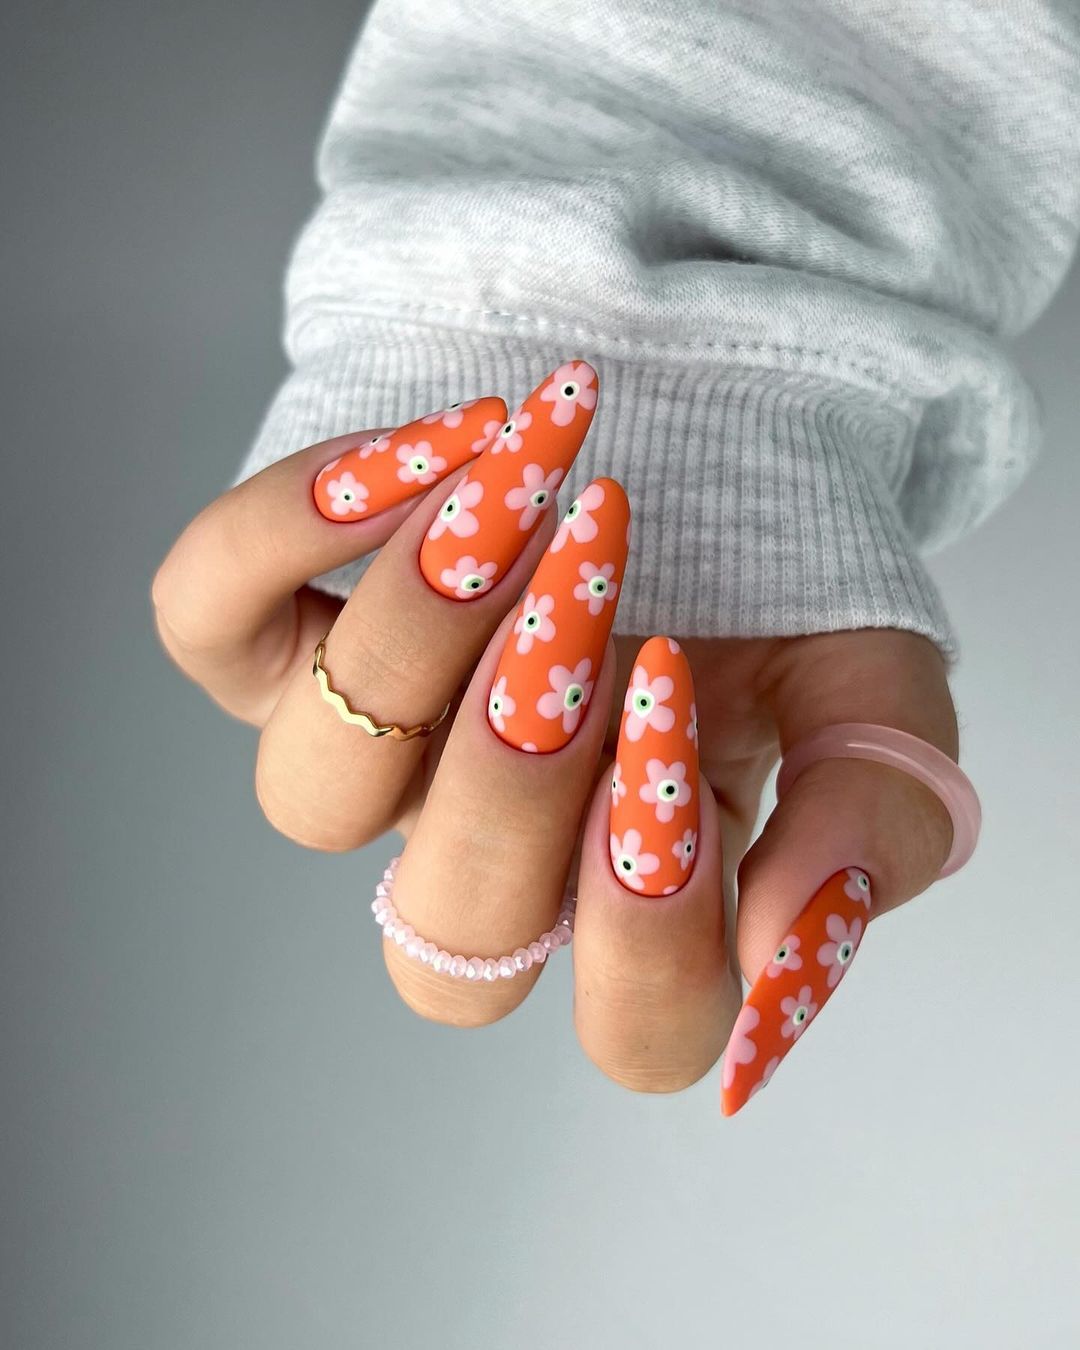
Orange Floral Nails
Orange floral nails are perfect for adding a touch of whimsy to your fall manicure. The bright orange base paired with cute white flowers creates a cheerful and festive look that’s sure to turn heads.
-
- Orange nail polish (e.g., China Glaze Nail Lacquer in “Orange Knockout”)
- White nail polish (e.g., Essie Nail Polish in “Blanc”)
- Green nail polish for flower centers (e.g., OPI Nail Lacquer in “I’m Sooo Swamped”)
- Dotting tool
- Clear top coat (e.g., Seche Vite Dry Fast Top Coat)
Home Instructions:
-
- Start with a base coat to ensure smooth application.
- Apply two coats of orange polish and let them dry thoroughly.
- Use a dotting tool to create white flower petals on each nail.
- Add small green dots in the center of each flower for a pop of color.
- Finish with a clear top coat to keep your design intact.
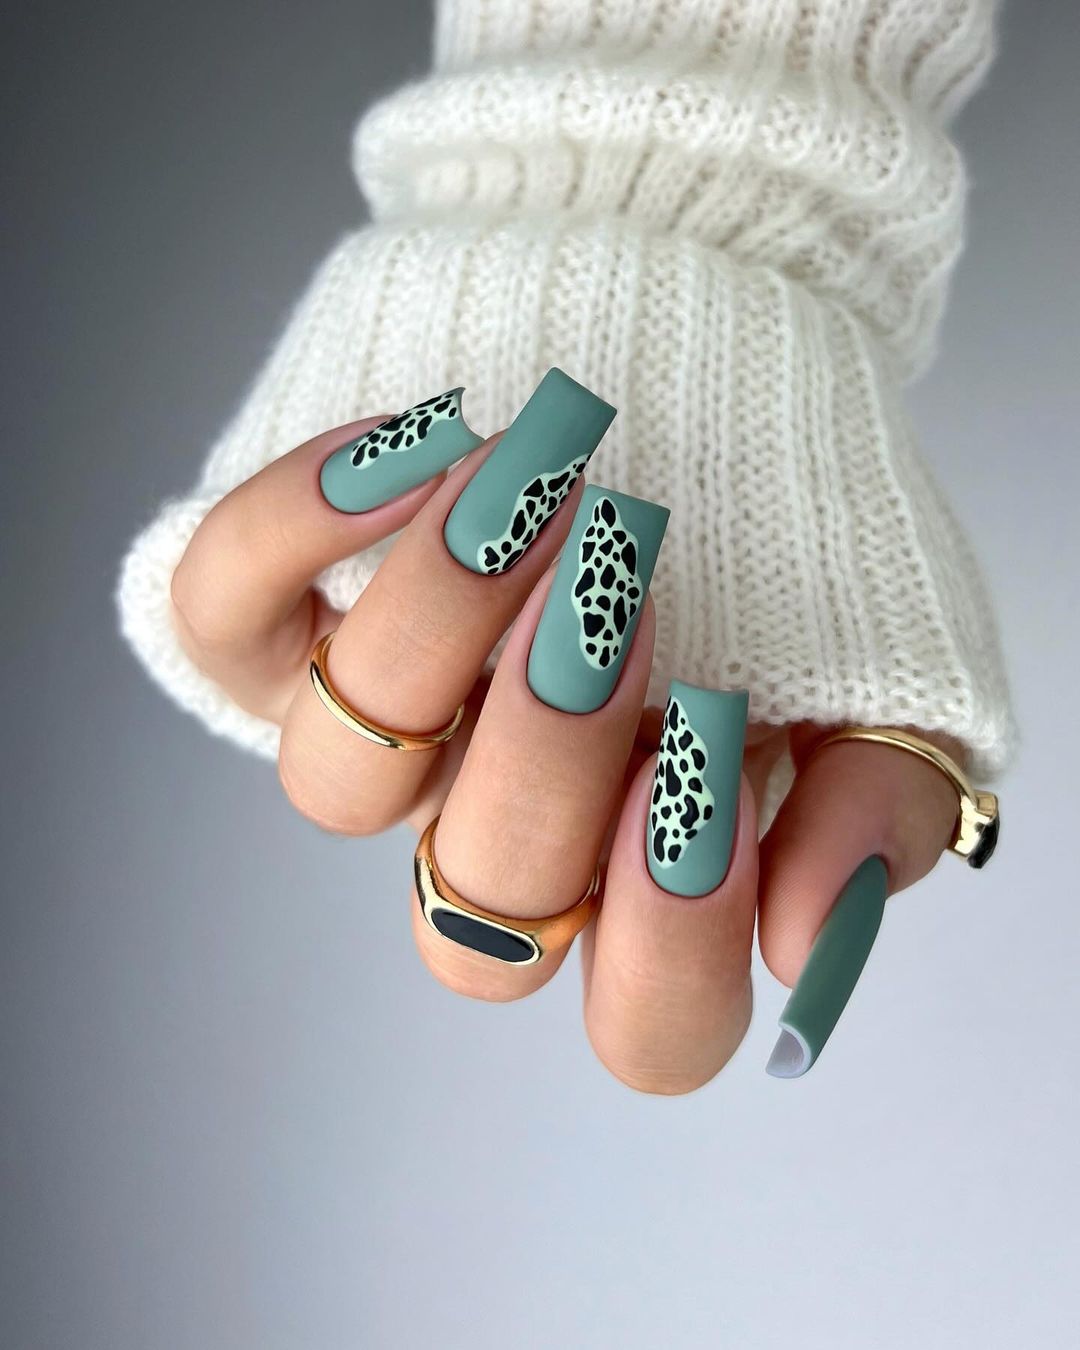
Sage Green with Leopard Accent
Sage green nails with a leopard accent are a stunning combination of calm and wild. The matte green base provides a sophisticated backdrop, while the leopard print adds a touch of boldness and playfulness. This design is perfect for those who want a subtle yet eye-catching look.
-
- Sage green nail polish (e.g., Essie Nail Polish in “Sage You Love Me”)
- Black nail polish (e.g., OPI Nail Lacquer in “Black Onyx”)
- White nail polish (e.g., Essie Nail Polish in “Blanc”)
- Fine nail art brush
- Matte top coat (e.g., Sally Hansen Miracle Gel Matte Top Coat)
Home Instructions:
-
- Apply a base coat to your nails.
- Paint all your nails with two coats of sage green polish.
- Use a fine nail art brush to create leopard spots with black and white polish.
- Let the design dry completely before applying a matte top coat to finish the look.
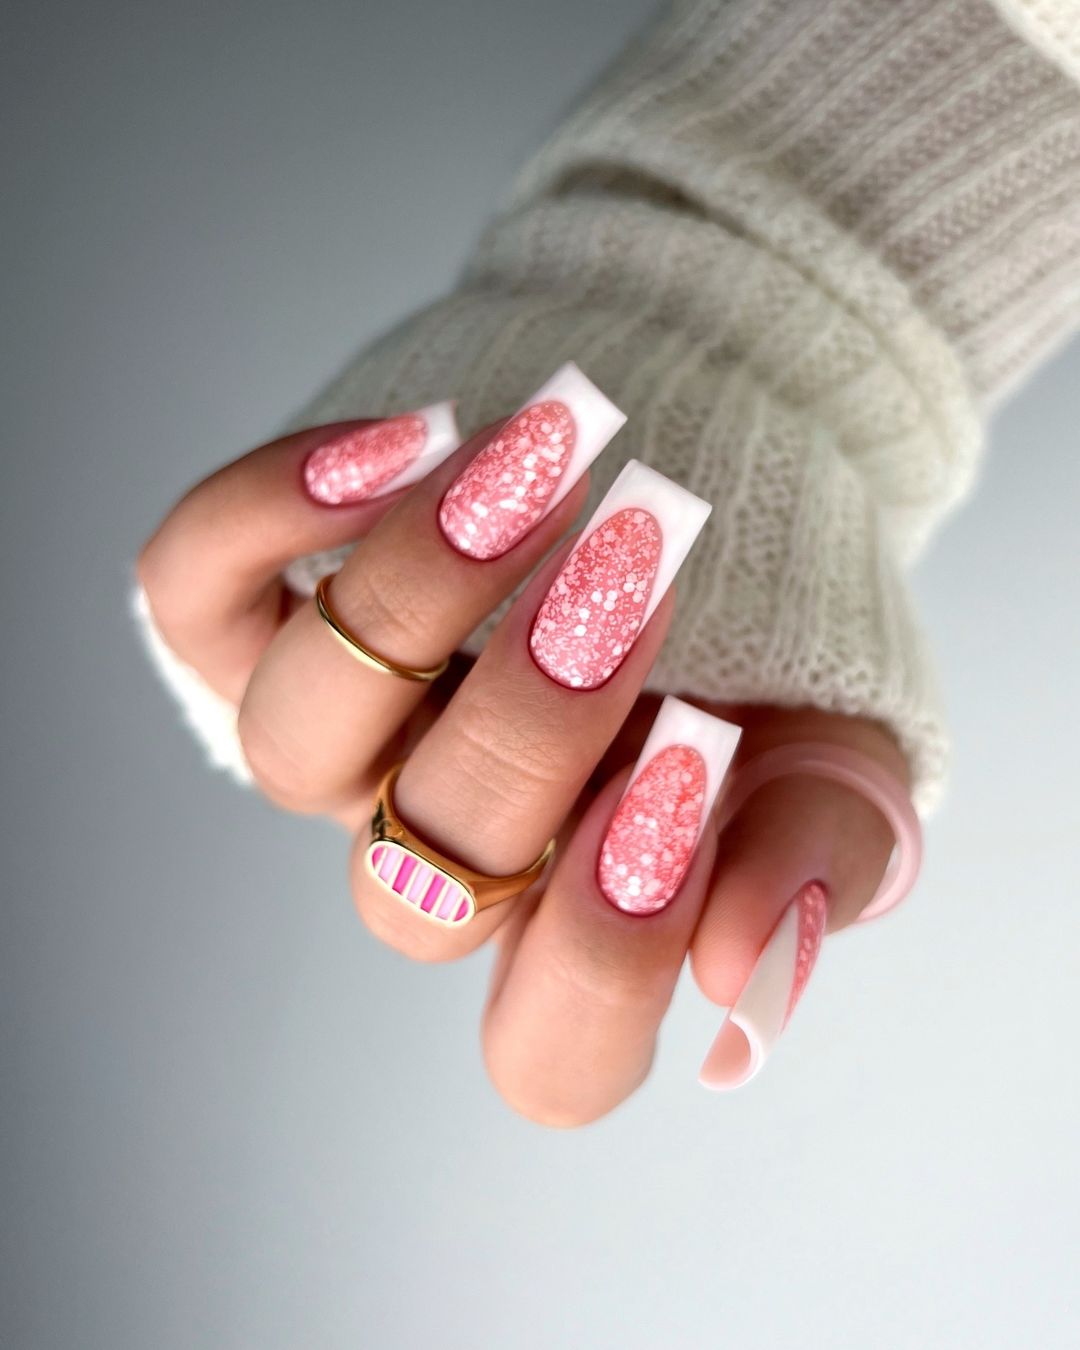
Pink Glitter French Tips
Pink glitter French tips are a glamorous twist on the classic French manicure. The pink glitter adds sparkle and fun, making this design perfect for parties or any festive occasion. The contrast between the glitter and the white tips creates a striking and elegant look.
-
- Pink glitter nail polish (e.g., China Glaze Nail Lacquer in “Fairy Dust”)
- White nail polish (e.g., Essie Nail Polish in “Blanc”)
- Clear top coat (e.g., Seche Vite Dry Fast Top Coat)
Home Instructions:
-
- Start with a base coat to protect your nails.
- Apply two coats of pink glitter polish.
- Use white polish to paint the tips of your nails in a French manicure style.
- Finish with a clear top coat to seal and protect the design.
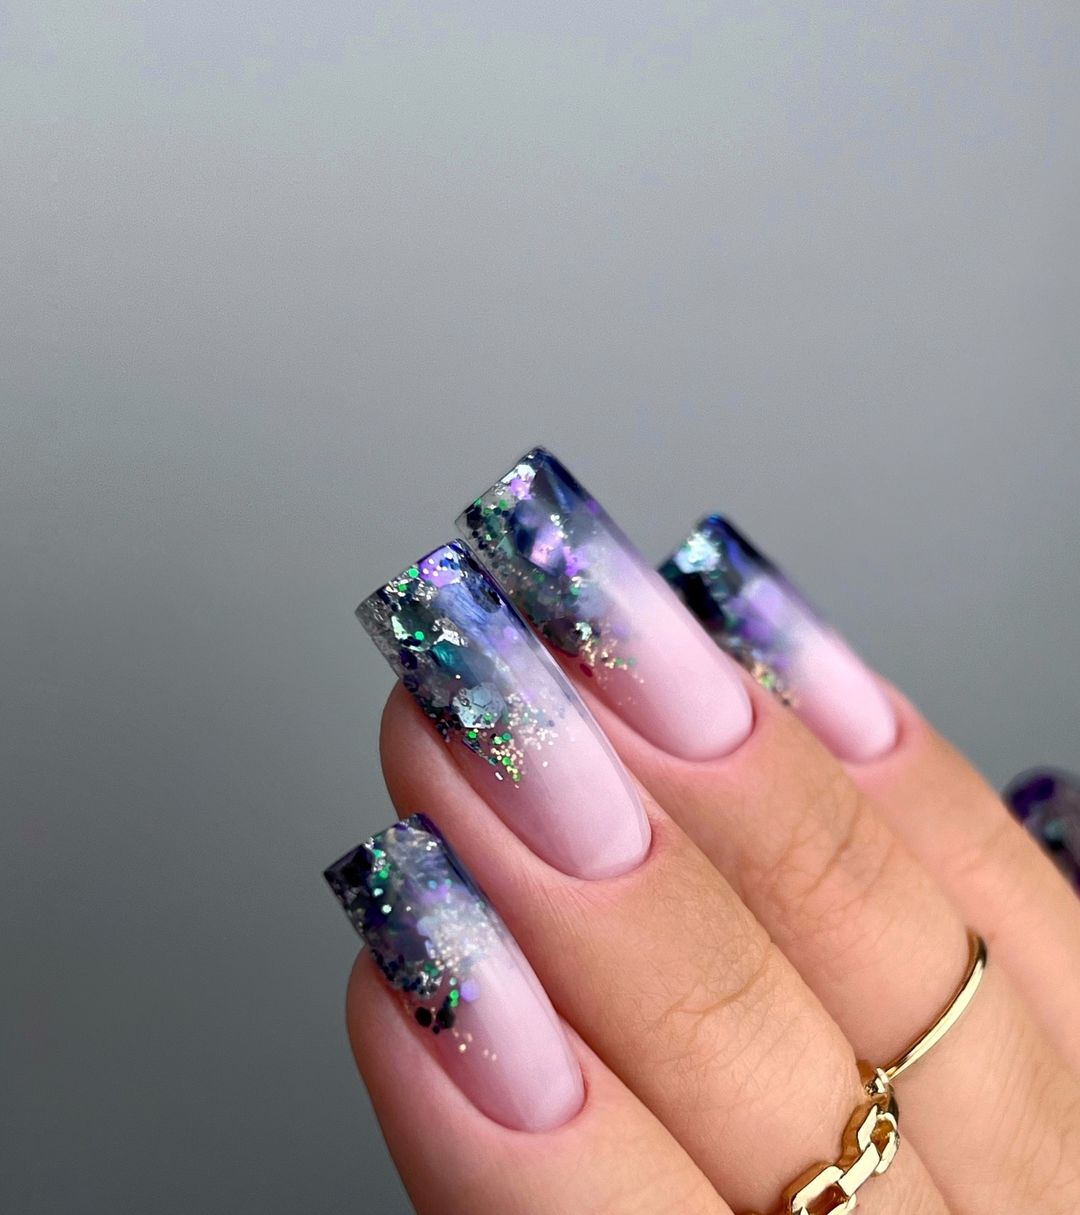
Galaxy Glitter Ombre
The galaxy glitter ombre design is perfect for those who love a bit of sparkle and mystery. This look features a gradient from dark, glittery tips to a soft, light base, mimicking the night sky. It’s a magical design that captures the essence of the universe on your nails.
-
- Black glitter nail polish (e.g., OPI Nail Lacquer in “Black Onyx”)
- Light pink nail polish (e.g., Essie Nail Polish in “Ballet Slippers”)
- Cosmetic sponge
- Clear top coat (e.g., Sally Hansen Insta-Dri Anti-Chip Top Coat)
Home Instructions:
-
- Apply a base coat to your nails.
- Paint your nails with two coats of light pink polish.
- Use a cosmetic sponge to dab black glitter polish onto the tips, creating a gradient effect.
- Allow the design to dry completely, then apply a clear top coat to protect your nails.
Save Pin

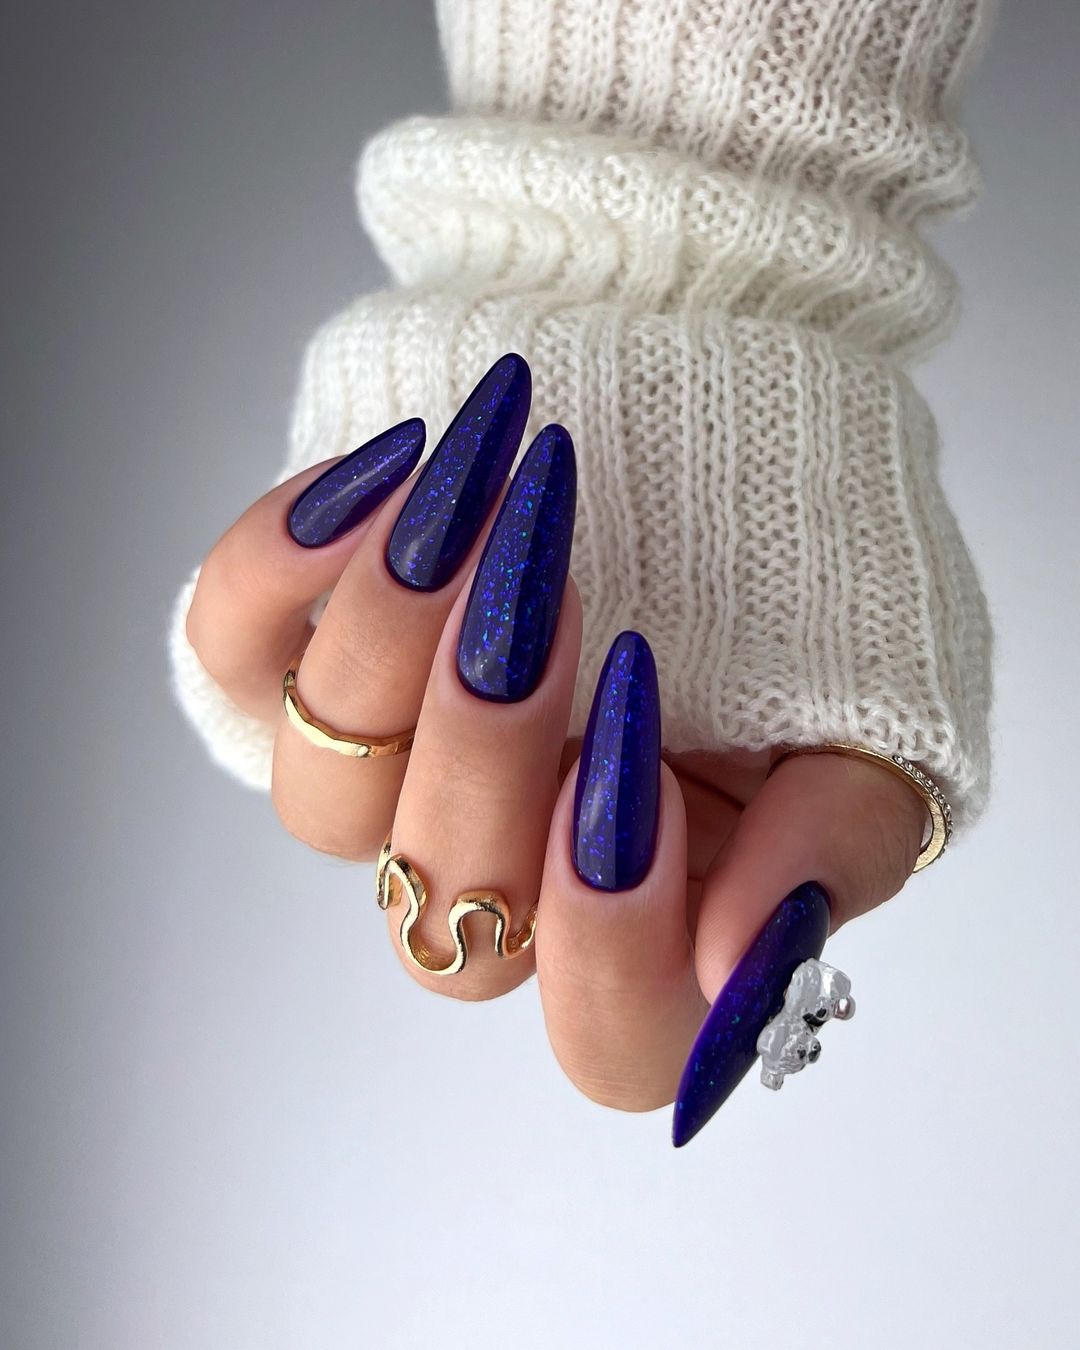
Royal Blue Glitter
Royal blue glitter nails are bold and elegant, perfect for making a statement. The deep blue color combined with glitter creates a luxurious and sophisticated look that is ideal for evening events or a night out.
-
- Royal blue glitter nail polish (e.g., Essie Nail Polish in “Aruba Blue”)
- Clear top coat (e.g., CND Vinylux Weekly Top Coat)
Home Instructions:
-
- Apply a base coat to your nails.
- Paint all your nails with two coats of royal blue glitter polish.
- Finish with a clear top coat to add shine and extend the wear of your manicure.
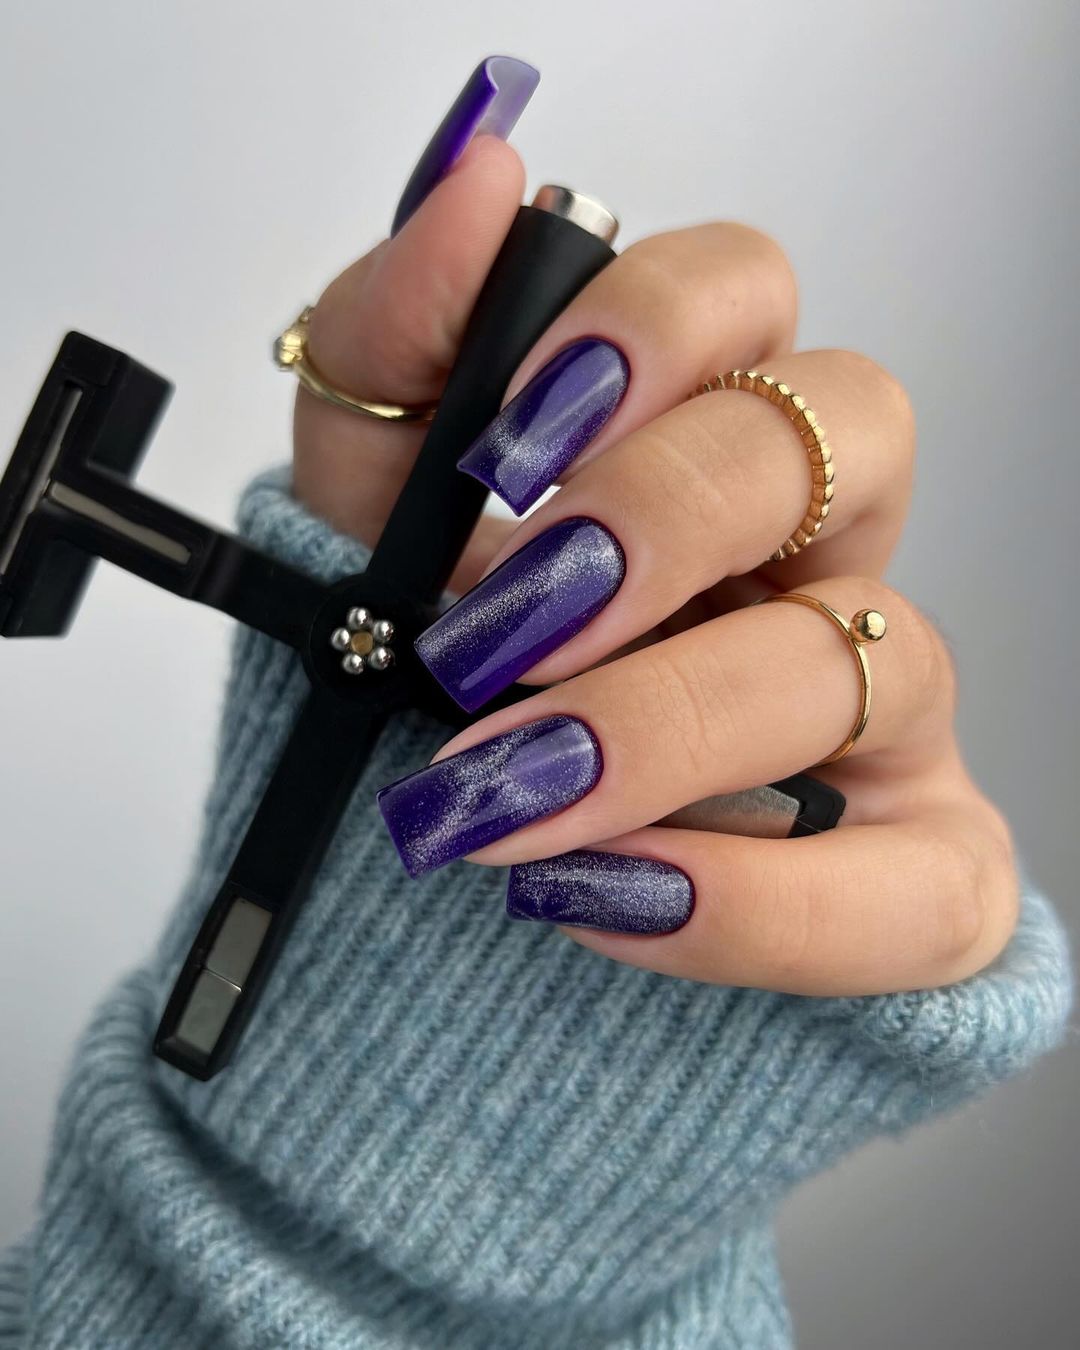
Purple Metallic Gradient
Purple metallic gradient nails are a stunning and modern design. The gradient effect from dark to light purple adds depth and dimension to your nails, while the metallic finish provides a sleek and shiny appearance.
-
- Dark purple nail polish (e.g., OPI Nail Lacquer in “Lincoln Park After Dark”)
- Light purple nail polish (e.g., Essie Nail Polish in “Lilacism”)
- Cosmetic sponge
- Clear top coat (e.g., Sally Hansen Miracle Gel Top Coat)
Home Instructions:
-
- Apply a base coat to your nails.
- Paint your nails with two coats of light purple polish.
- Use a cosmetic sponge to dab dark purple polish onto the tips, creating a gradient effect.
- Allow the design to dry completely, then apply a clear top coat to seal the design.
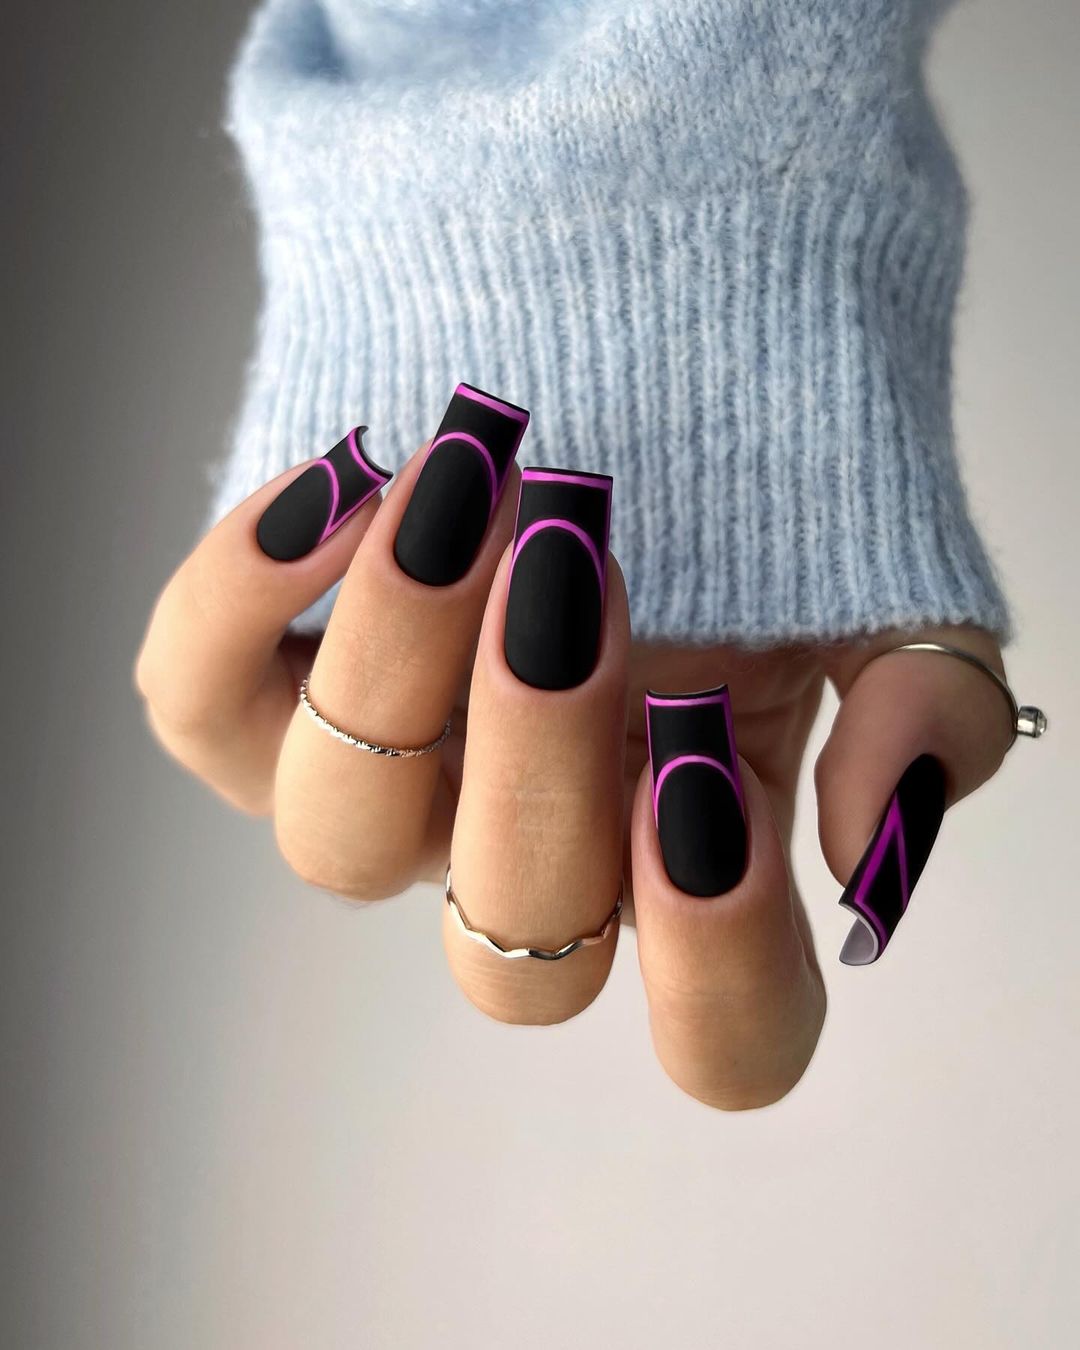
Black with Neon Pink Accents
Black nails with neon pink accents are edgy and stylish. The matte black base with sharp neon pink lines creates a striking contrast that is perfect for those who love bold and modern designs.
-
- Black nail polish (e.g., Essie Nail Polish in “Licorice”)
- Neon pink nail polish (e.g., China Glaze Nail Lacquer in “Shocking Pink”)
- Fine nail art brush
- Matte top coat (e.g., OPI Matte Top Coat)
Home Instructions:
-
- Apply a base coat to your nails.
- Paint all your nails with two coats of black polish.
- Use a fine nail art brush to create neon pink lines and accents.
- Finish with a matte top coat to give the design a sleek finish.
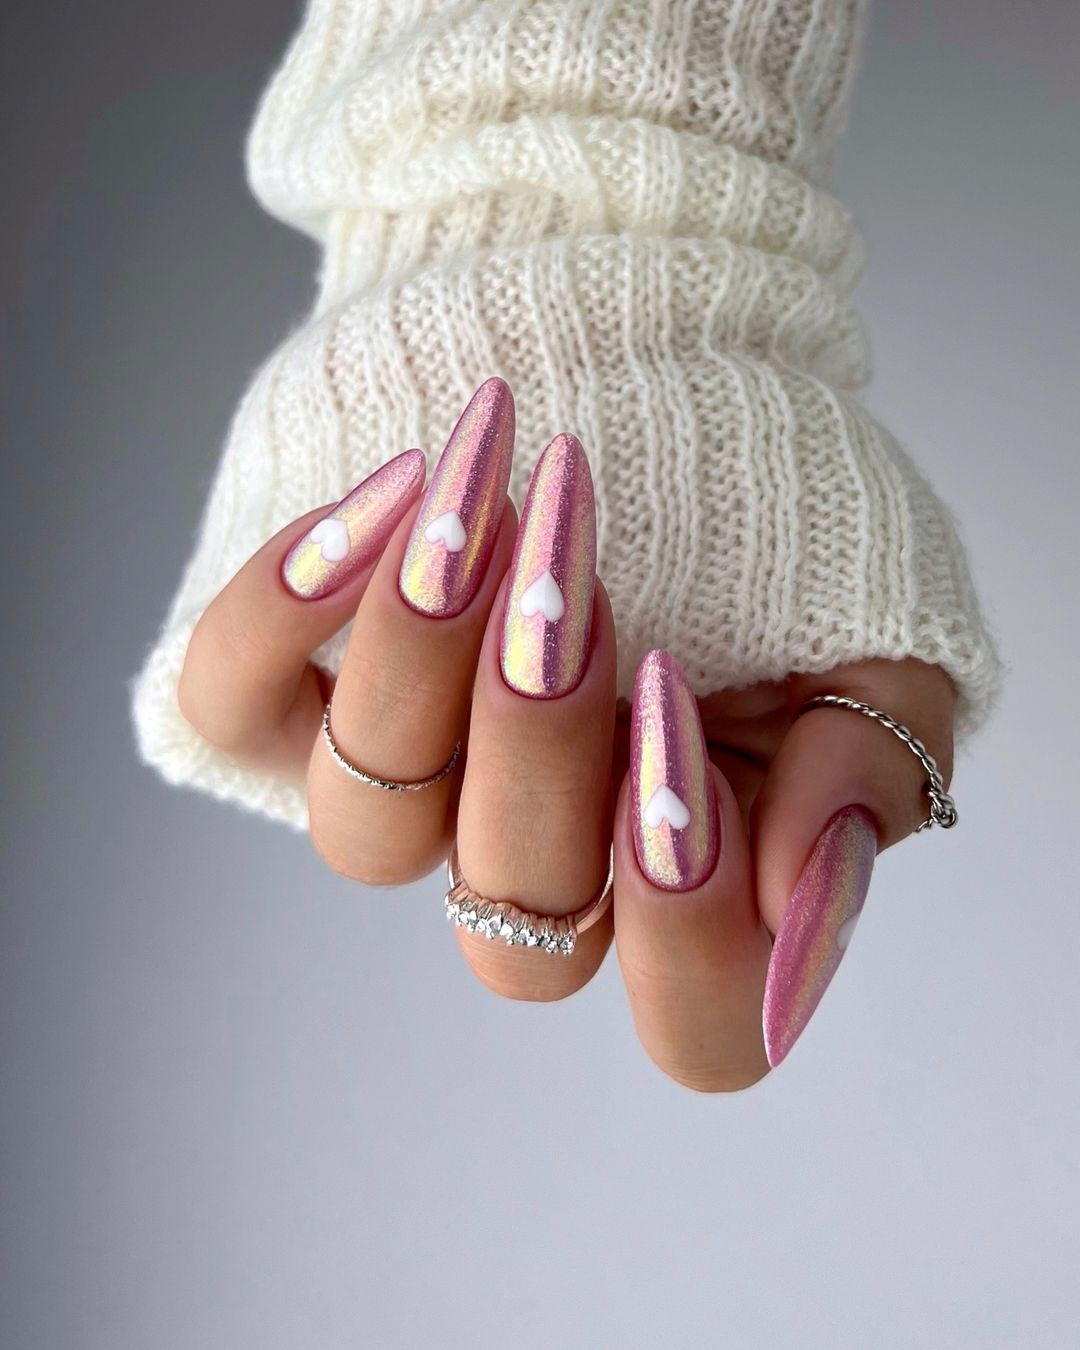
Pink Holographic Hearts
These pink holographic nails with heart accents are absolutely dreamy. The iridescent sheen adds a magical touch to the design, making it perfect for those who love a bit of sparkle. The white heart accents create a delicate and romantic look, ideal for any special occasion.
-
- Pink holographic nail polish (e.g., ILNP Nail Polish in “Dreamsicle”)
- White nail polish (e.g., Essie Nail Polish in “Blanc”)
- Fine nail art brush
- Clear top coat (e.g., Seche Vite Dry Fast Top Coat)
Home Instructions:
-
- Apply a base coat to protect your nails.
- Paint all your nails with two coats of pink holographic polish.
- Use a fine nail art brush to paint small white hearts on each nail.
- Allow the design to dry completely before applying a clear top coat to seal and protect the design.
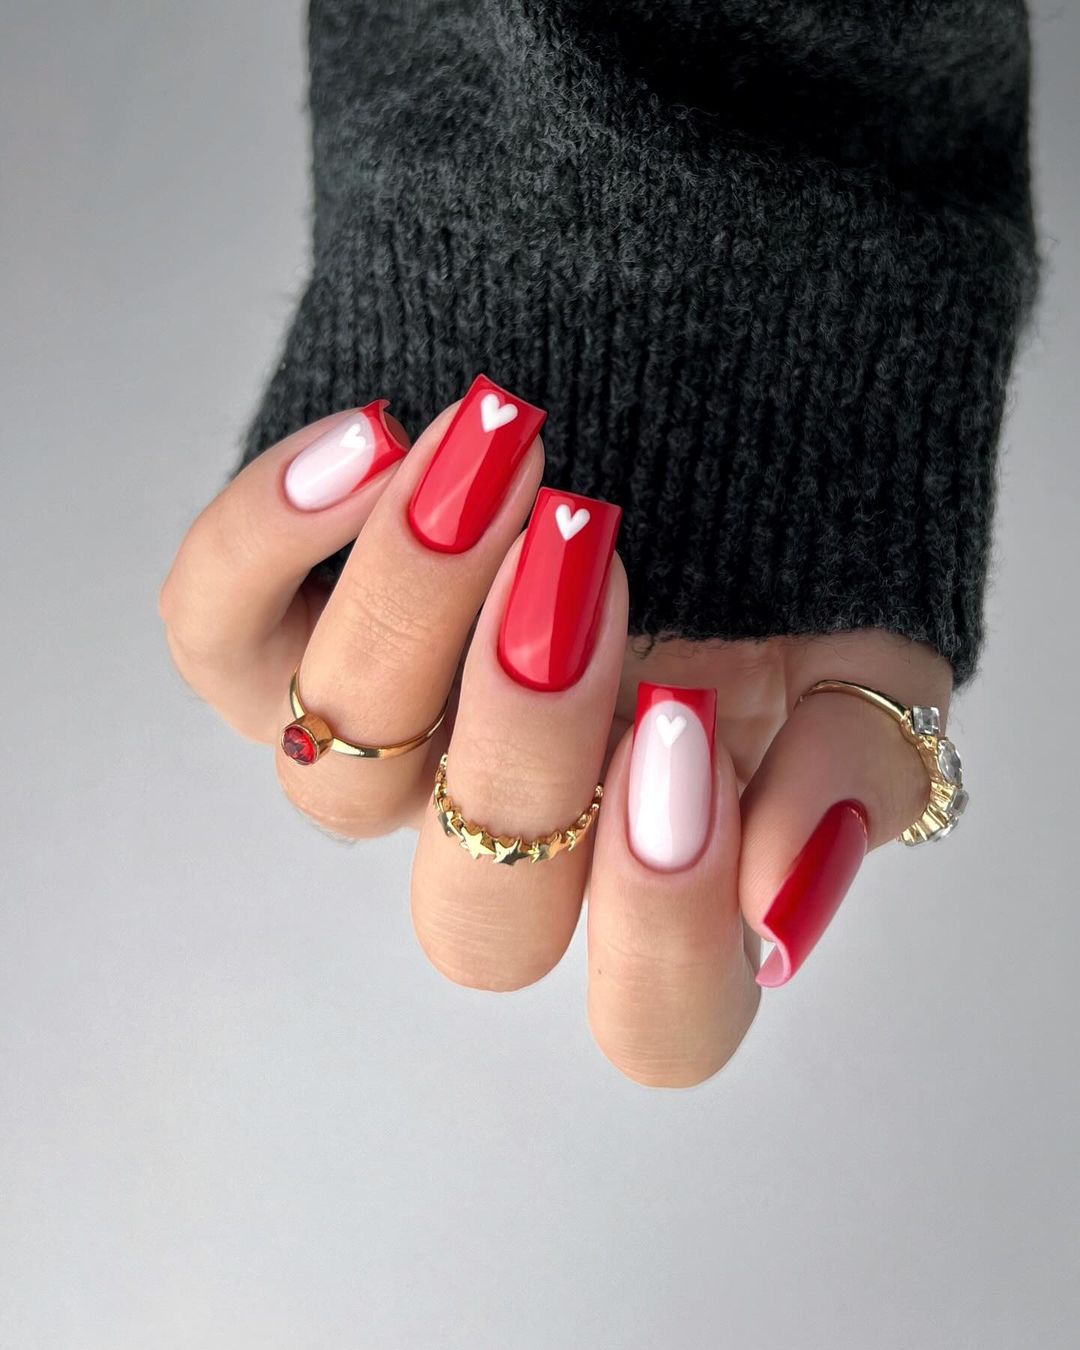
Red and White Heart Nails
This striking red and white design with heart accents is bold and romantic. The vibrant red nails are complemented by a single white accent nail on each hand, each featuring a small red heart. This design is perfect for those who want to make a statement with their manicure.
-
- Red nail polish (e.g., OPI Nail Lacquer in “Big Apple Red”)
- White nail polish (e.g., Essie Nail Polish in “Blanc”)
- Fine nail art brush
- Clear top coat (e.g., Sally Hansen Insta-Dri Anti-Chip Top Coat)
Home Instructions:
-
- Apply a base coat to your nails.
- Paint your nails with two coats of red polish, leaving one accent nail on each hand white.
- Use a fine nail art brush to paint small red hearts on the white accent nails.
- Finish with a clear top coat to seal and protect your design.
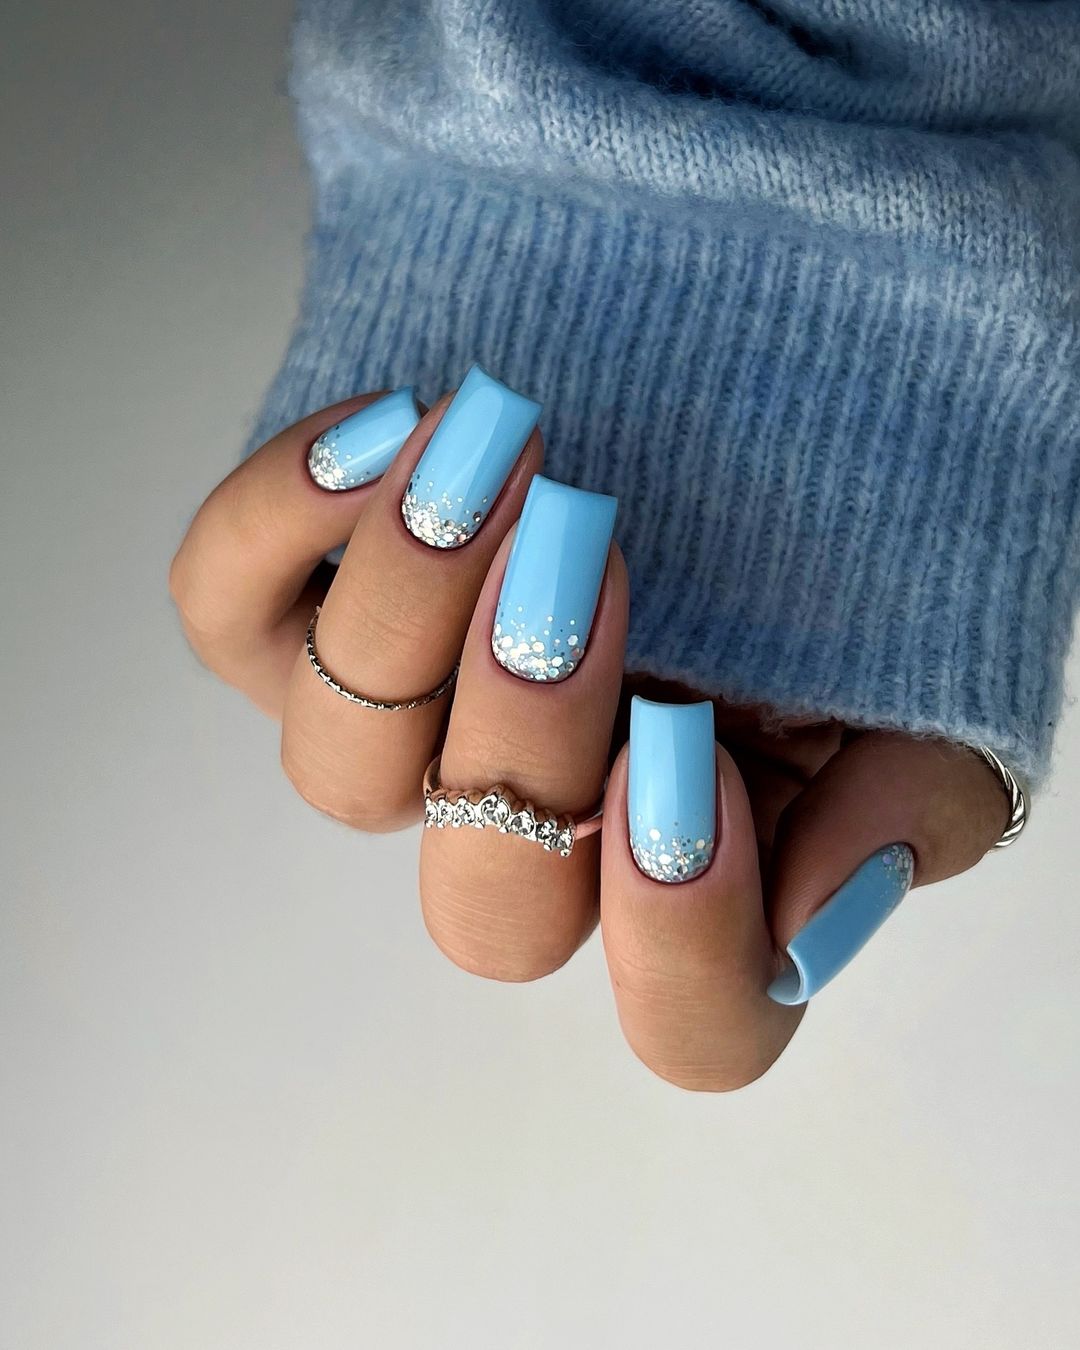
Blue Glitter Tips
The blue glitter tips design is a fresh and fun take on a classic French manicure. The light blue base with glittery tips adds a touch of sparkle and glamour, making it perfect for both everyday wear and special occasions.
-
- Light blue nail polish (e.g., Essie Nail Polish in “Bikini So Teeny”)
- Silver glitter nail polish (e.g., China Glaze Nail Lacquer in “Fairy Dust”)
- Clear top coat (e.g., CND Vinylux Weekly Top Coat)
Home Instructions:
-
- Start with a base coat to protect your nails.
- Paint your nails with two coats of light blue polish.
- Use a cosmetic sponge to apply silver glitter polish to the tips of your nails.
- Finish with a clear top coat to seal the design.
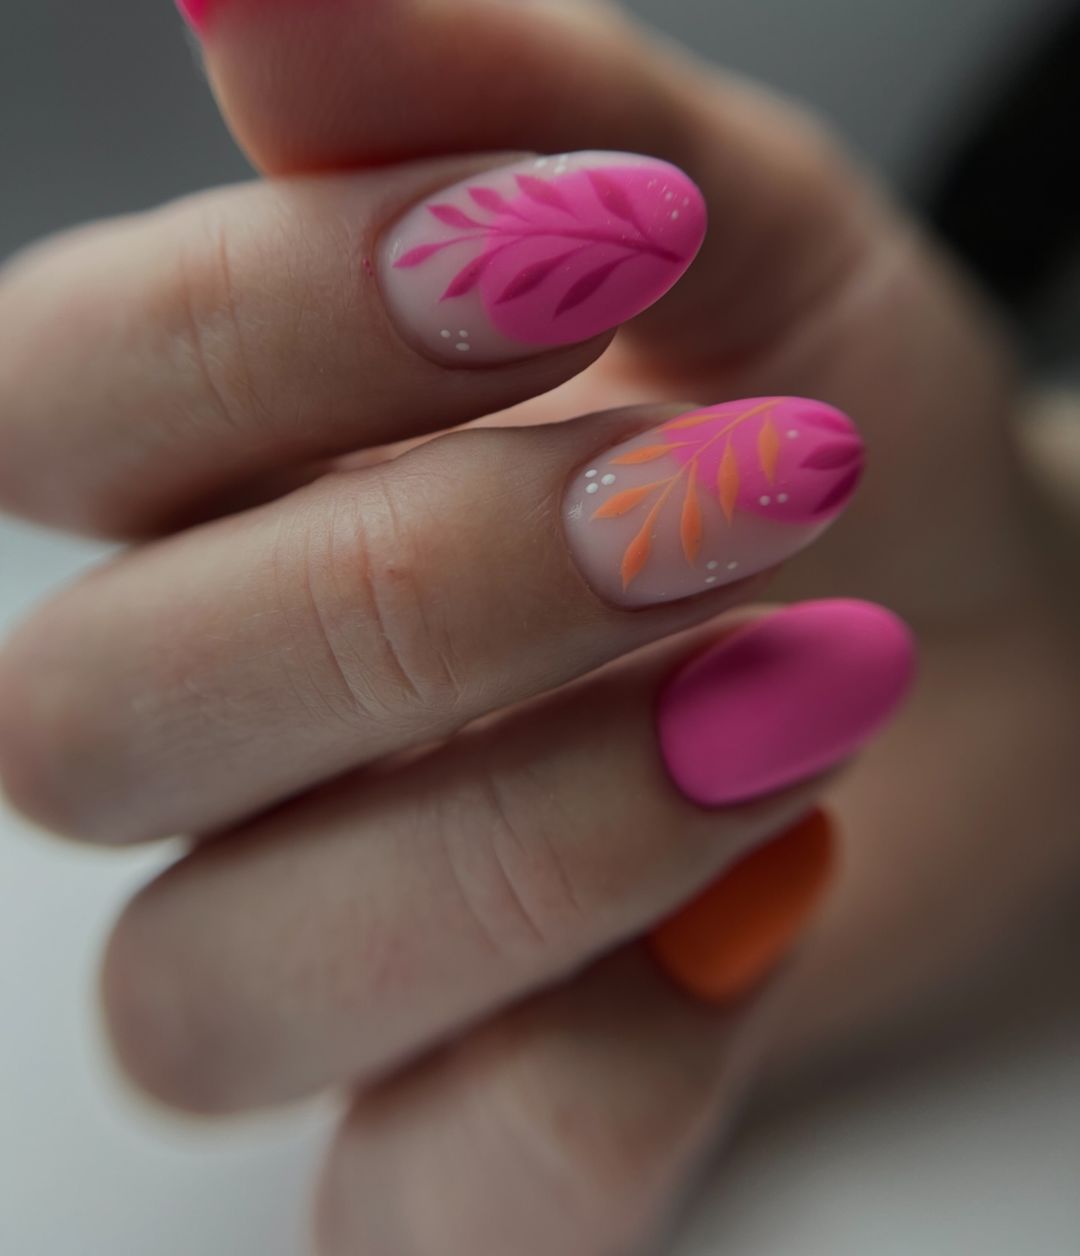
Pink and Orange Leaf Design
This vibrant pink and orange leaf design is perfect for autumn. The bright colors and detailed leaf patterns create a playful and cheerful look that’s sure to brighten up any day.
-
- Pink nail polish (e.g., OPI Nail Lacquer in “Pink Flamenco”)
- Orange nail polish (e.g., Essie Nail Polish in “Tart Deco”)
- White nail polish (e.g., OPI Nail Lacquer in “Alpine Snow”)
- Fine nail art brush
- Clear top coat (e.g., Sally Hansen Miracle Gel Top Coat)
Home Instructions:
-
- Apply a base coat to your nails.
- Paint your nails with two coats of pink polish.
- Use a fine nail art brush to create leaf designs with orange and white polish.
- Finish with a clear top coat to protect your design.
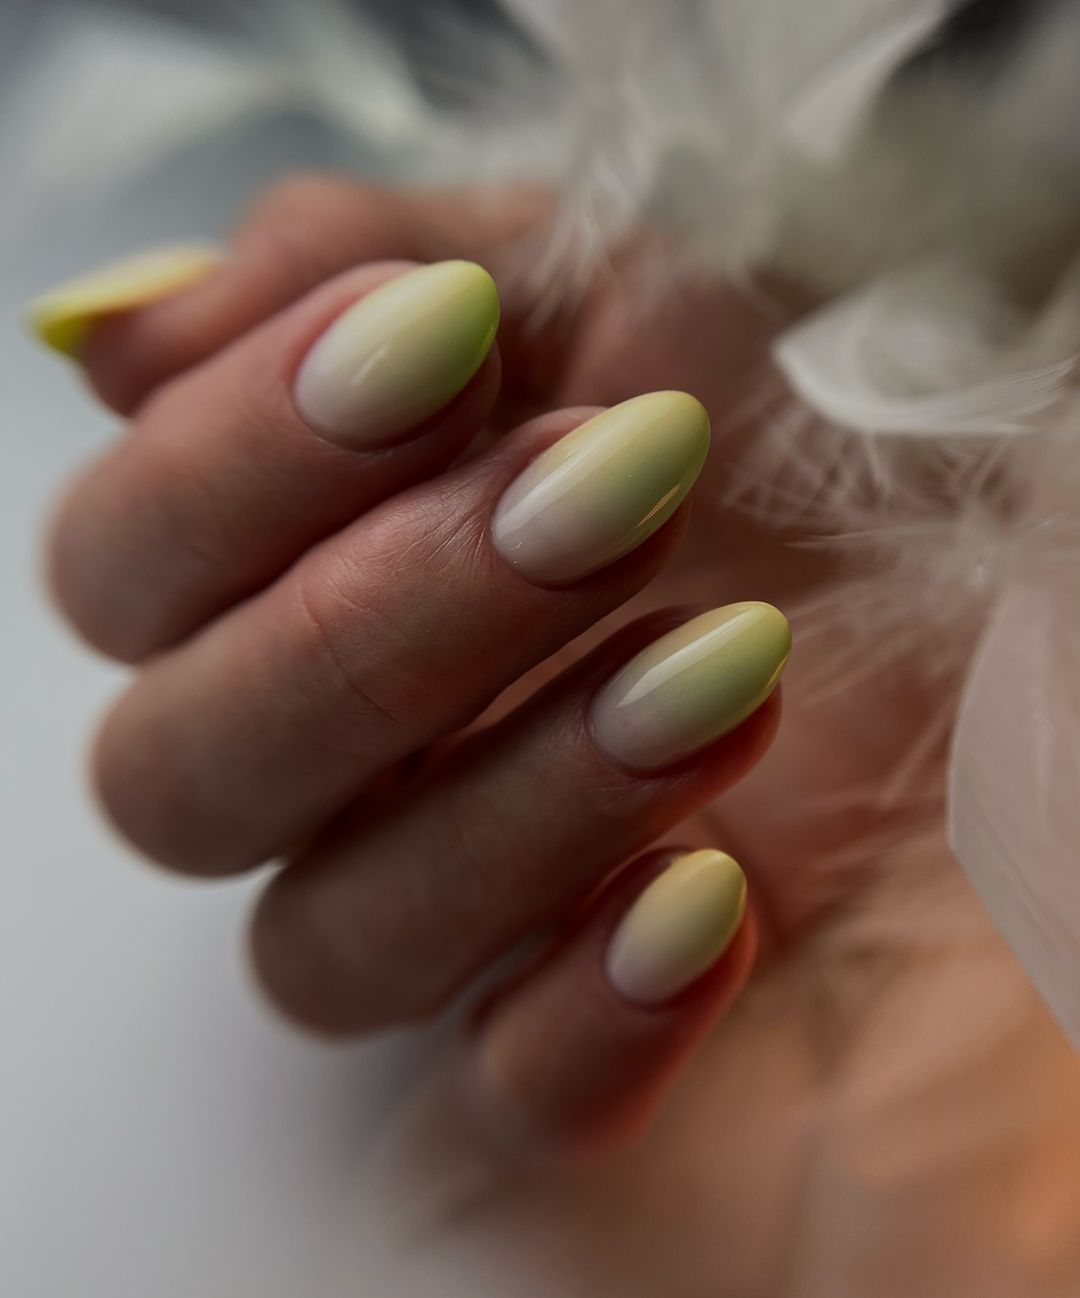
Gradient Green Ombre
The gradient green ombre design is a sophisticated and elegant look. The seamless transition from a soft green to a more intense shade gives the nails a fresh and natural appearance, perfect for any occasion.
-
- Light green nail polish (e.g., Essie Nail Polish in “Mint Candy Apple”)
- Dark green nail polish (e.g., OPI Nail Lacquer in “Jade is the New Black”)
- Cosmetic sponge
- Clear top coat (e.g., Seche Vite Dry Fast Top Coat)
Home Instructions:
-
- Apply a base coat to your nails.
- Paint your nails with two coats of light green polish.
- Use a cosmetic sponge to apply dark green polish to the tips, creating a gradient effect.
- Allow the design to dry completely, then apply a clear top coat to seal the design.
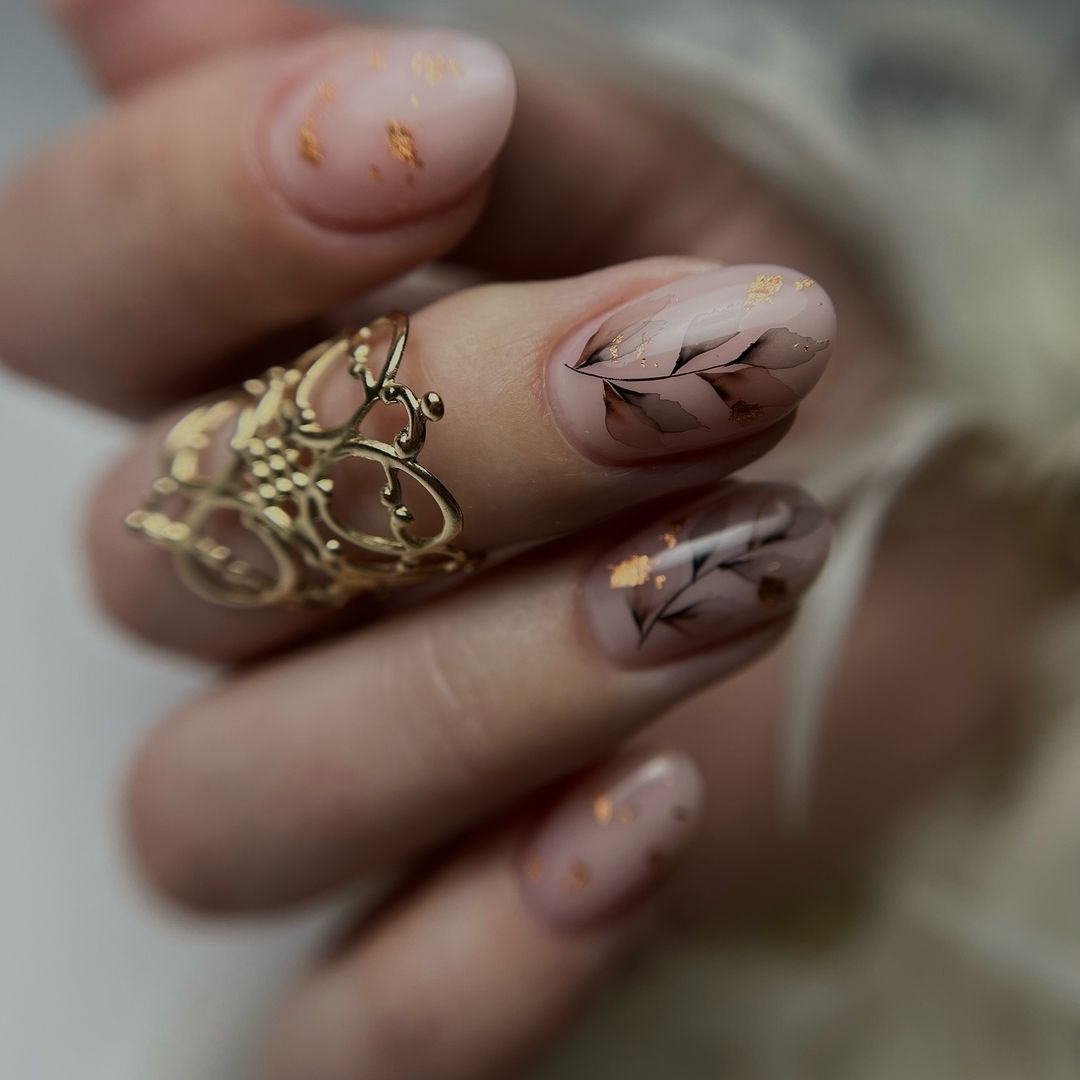
Nude with Leaf Accents
Nude nails with delicate leaf accents are timeless and chic. The subtle base color makes the black leaf designs stand out, creating a sophisticated and elegant look suitable for any occasion.
-
- Nude nail polish (e.g., Essie Nail Polish in “Ballet Slippers”)
- Black nail polish (e.g., OPI Nail Lacquer in “Black Onyx”)
- Fine nail art brush
- Clear top coat (e.g., Sally Hansen Insta-Dri Anti-Chip Top Coat)
Home Instructions:
-
- Apply a base coat to your nails.
- Paint your nails with two coats of nude polish.
- Use a fine nail art brush to paint black leaf designs on each nail.
- Finish with a clear top coat to seal and protect your design.
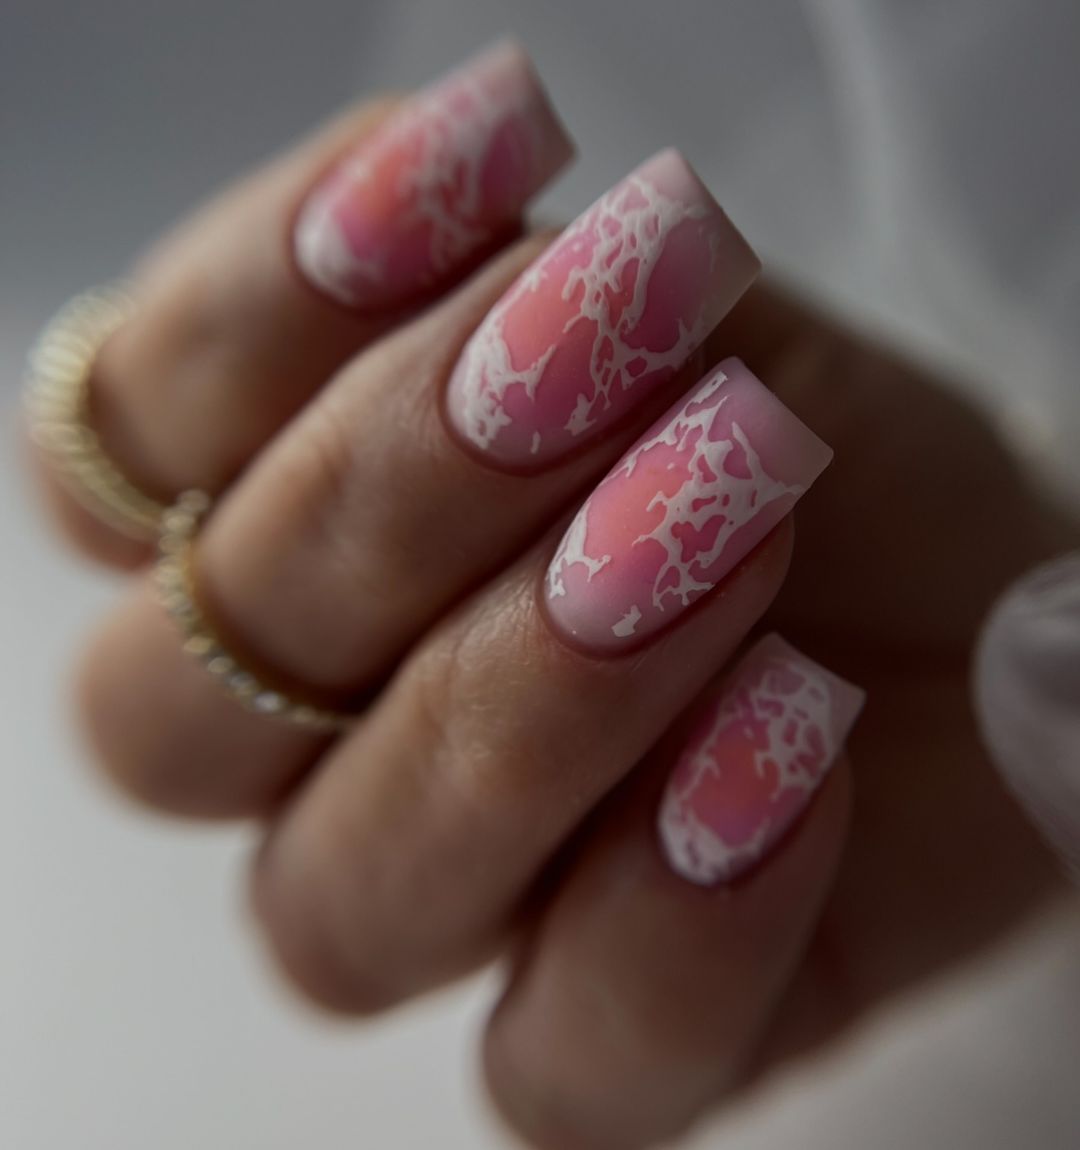
Pink Marble Nails
These pink marble nails offer a sophisticated and artistic look. The design features a blend of pink shades with white marble veins, creating an elegant and eye-catching manicure that’s perfect for any occasion.
-
- Light pink nail polish (e.g., Essie Nail Polish in “Fiji”)
- Dark pink nail polish (e.g., OPI Nail Lacquer in “Pompeii Purple”)
- White nail polish (e.g., Essie Nail Polish in “Blanc”)
- Fine nail art brush or nail art stamper
- Clear top coat (e.g., Seche Vite Dry Fast Top Coat)
Home Instructions:
-
- Apply a base coat to your nails.
- Paint your nails with a base color of light pink polish.
- Using a fine brush or stamper, create marble-like veins with dark pink and white polish.
- Blend the colors gently for a natural marble effect.
- Finish with a clear top coat to seal and protect the design.
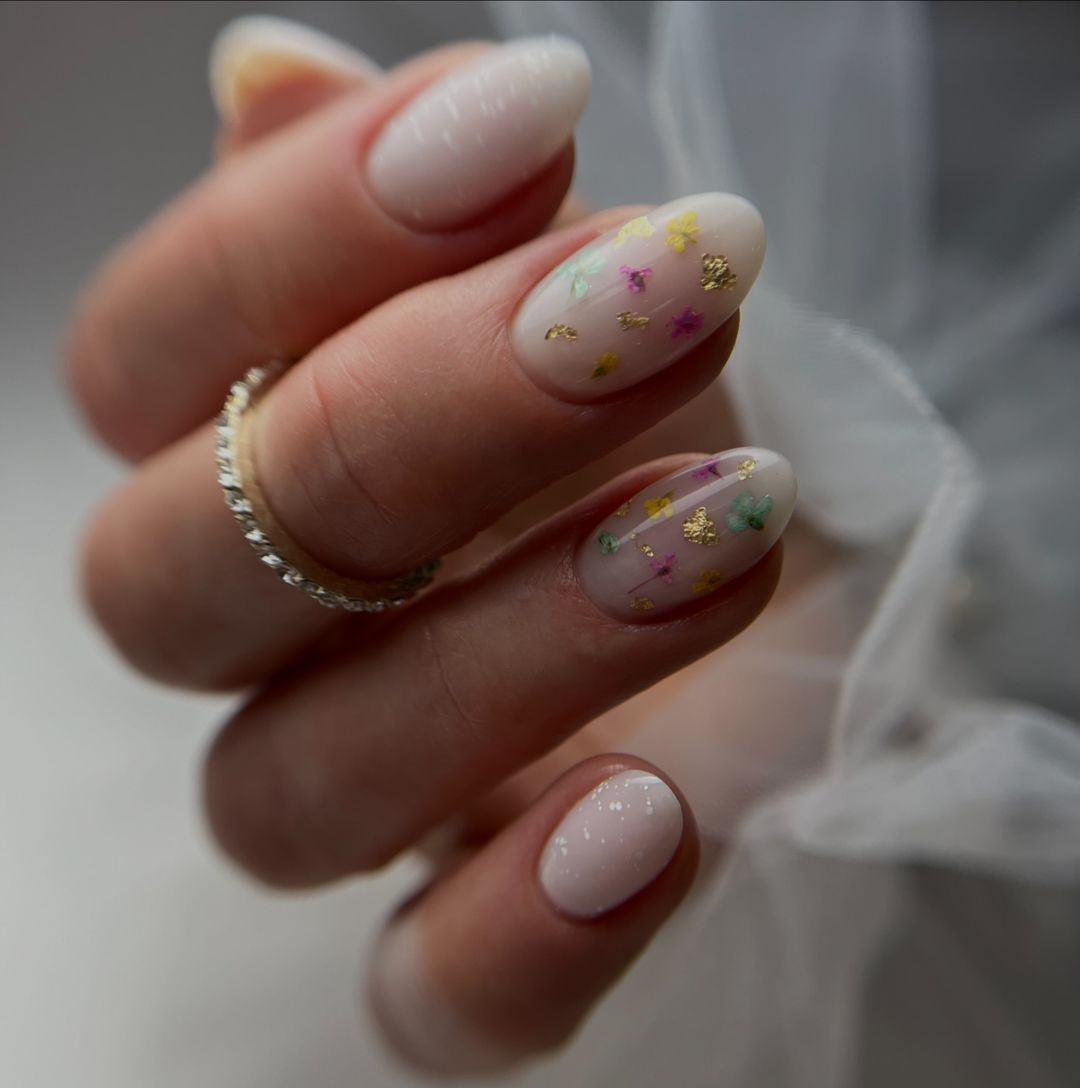
Pastel Floral Accents
Pastel floral nails bring a delicate and feminine touch to your manicure. The nude base is adorned with colorful floral accents, giving the design a fresh and whimsical feel.
-
- Nude nail polish (e.g., OPI Nail Lacquer in “Samoan Sand”)
- Pastel nail polishes in various colors (e.g., Essie Nail Polish in “Mint Candy Apple”, “Lilacism”, “Van D’Go”)
- Clear top coat (e.g., Sally Hansen Miracle Gel Top Coat)
Home Instructions:
-
- Apply a base coat to your nails.
- Paint your nails with a nude polish.
- Use a fine nail art brush to paint small flowers and leaves with pastel colors.
- Allow the design to dry completely before applying a clear top coat to protect your artwork.
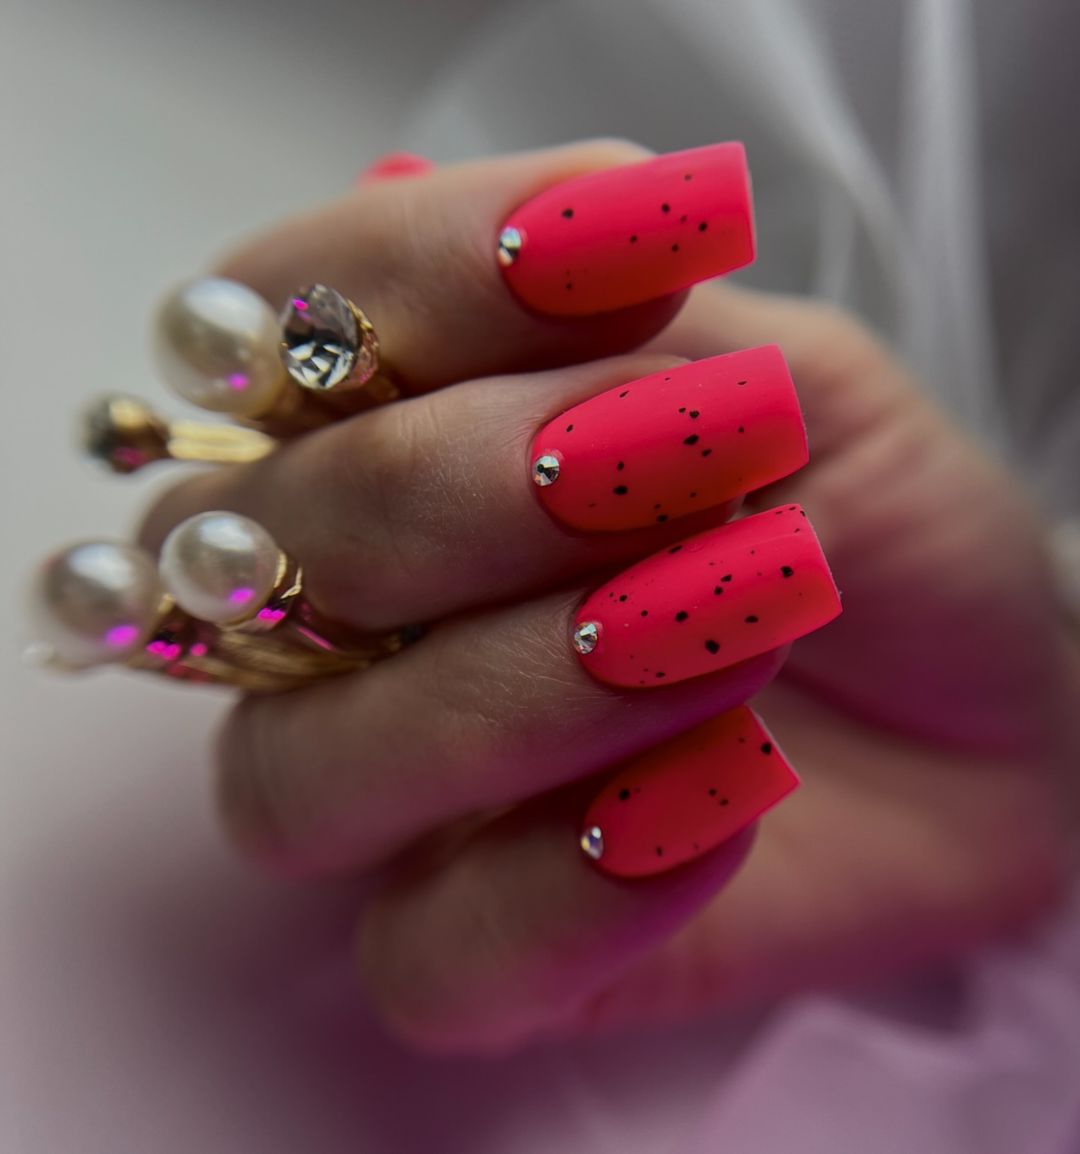
Neon Pink with Black Specks
Neon pink nails with black specks are bold and fun, perfect for making a statement. The bright neon color is contrasted by subtle black specks, creating a unique and modern look.
-
- Neon pink nail polish (e.g., China Glaze Nail Lacquer in “Shocking Pink”)
- Black nail polish (e.g., Essie Nail Polish in “Licorice”)
- Dotting tool or thin brush
- Clear top coat (e.g., Seche Vite Dry Fast Top Coat)
Home Instructions:
-
- Apply a base coat to your nails.
- Paint your nails with two coats of neon pink polish.
- Use a dotting tool or thin brush to add black specks randomly on each nail.
- Seal the design with a clear top coat to ensure longevity.
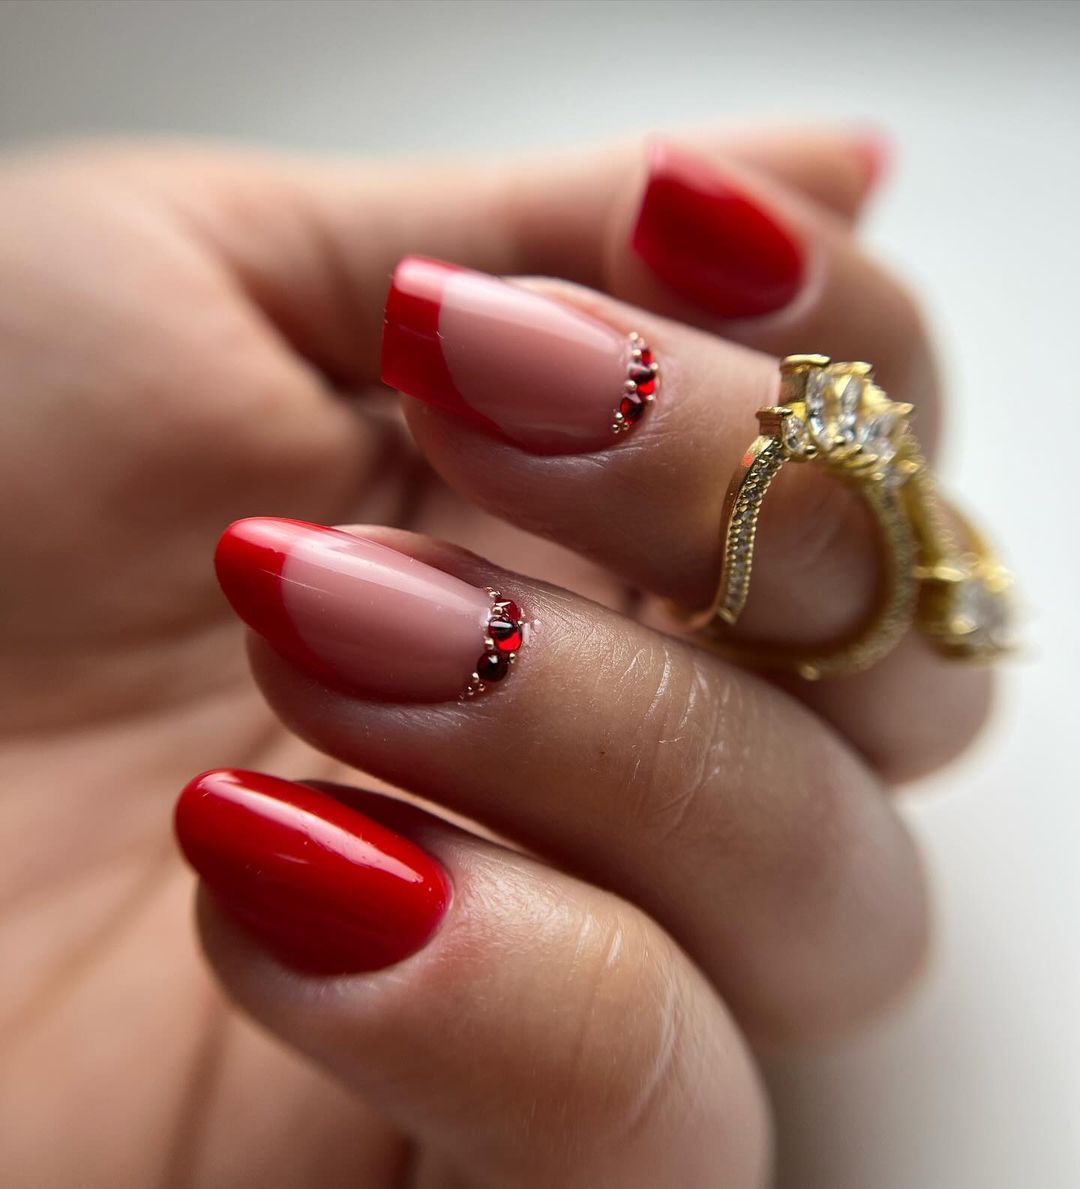
Classic Red French Tips
These classic red French tips are a modern twist on the traditional French manicure. The red tips add a pop of color to the nude base, creating a chic and sophisticated look.
-
- Nude nail polish (e.g., Essie Nail Polish in “Ballet Slippers”)
- Red nail polish (e.g., OPI Nail Lacquer in “Big Apple Red”)
- Fine nail art brush or French tip guides
- Clear top coat (e.g., Sally Hansen Insta-Dri Anti-Chip Top Coat)
Home Instructions:
-
- Apply a base coat to your nails.
- Paint your nails with a nude polish.
- Use a fine brush or French tip guides to paint red tips on each nail.
- Finish with a clear top coat to protect your design.
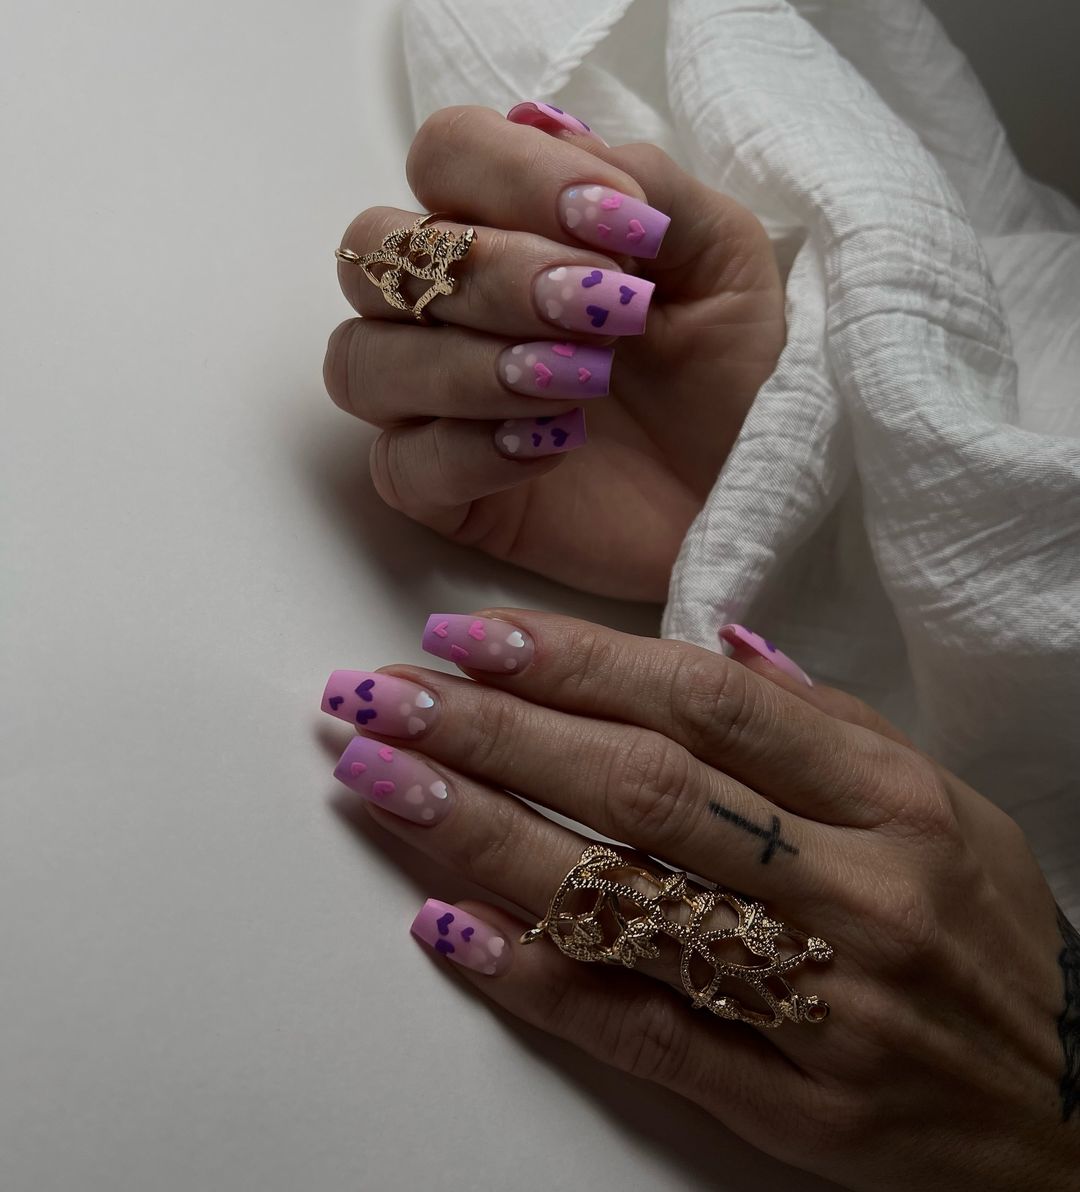
Purple Heart Accents
Purple heart accents on a soft pink base create a cute and romantic design. This manicure is perfect for adding a touch of sweetness to your look.
-
- Soft pink nail polish (e.g., OPI Nail Lacquer in “Bubble Bath”)
- Purple nail polish (e.g., Essie Nail Polish in “Play Date”)
- Fine nail art brush
- Clear top coat (e.g., CND Vinylux Weekly Top Coat)
Home Instructions:
-
- Apply a base coat to your nails.
- Paint your nails with two coats of soft pink polish.
- Use a fine nail art brush to paint small purple hearts on each nail.
- Seal the design with a clear top coat for a glossy finish.
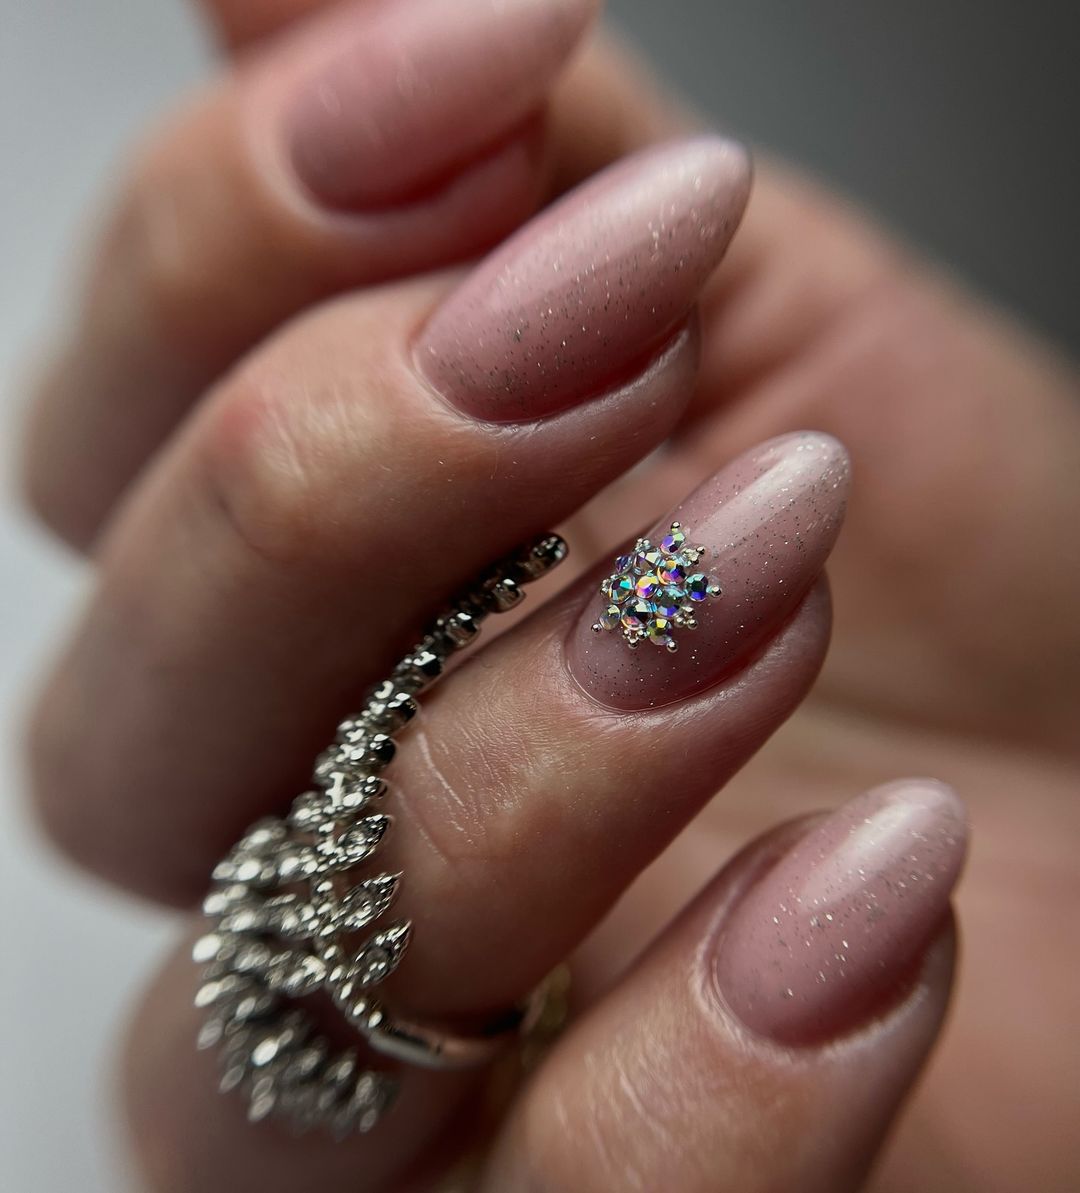
Sparkling Nude with Rhinestone Accent
This sparkling nude design with a rhinestone accent is elegant and glamorous. The subtle sparkle of the nude polish is complemented by a single, eye-catching rhinestone on each ring finger.
-
- Nude glitter nail polish (e.g., Essie Nail Polish in “Jiggle Hi, Jiggle Low”)
- Clear rhinestones
- Nail glue
- Clear top coat (e.g., Seche Vite Dry Fast Top Coat)
Home Instructions:
-
- Apply a base coat to your nails.
- Paint your nails with two coats of nude glitter polish.
- Attach a rhinestone to each ring finger using nail glue.
- Finish with a clear top coat to keep the rhinestones in place.
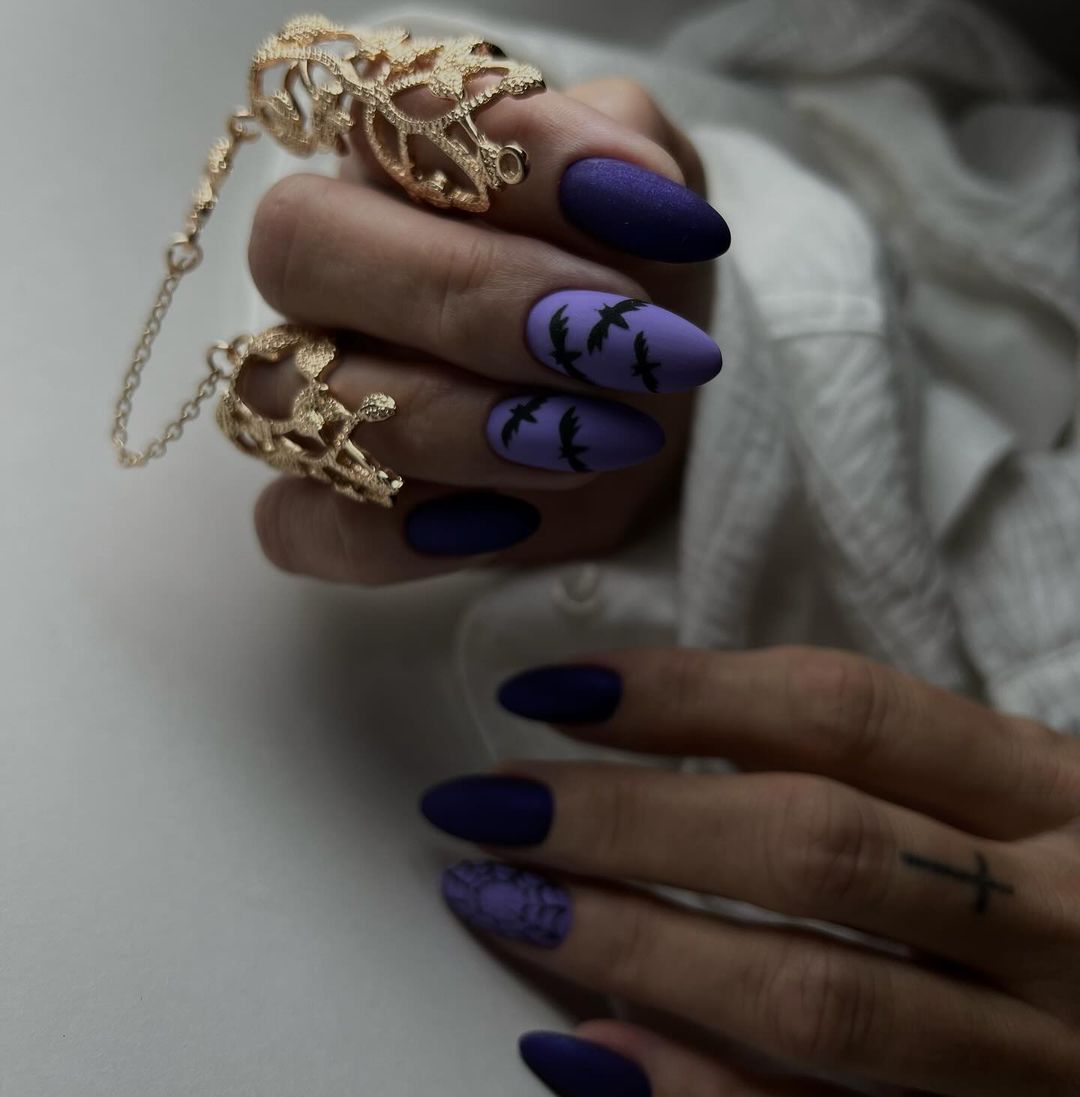
Purple Halloween Bats
These purple Halloween bats nails are perfect for the spooky season. The matte purple base with black bat silhouettes adds a playful and festive touch to your manicure.
-
- Matte purple nail polish (e.g., OPI Nail Lacquer in “Do You Lilac It?”)
- Black nail polish (e.g., Essie Nail Polish in “Licorice”)
- Fine nail art brush or bat nail stickers
- Matte top coat (e.g., OPI Matte Top Coat)
Home Instructions:
-
- Apply a base coat to your nails.
- Paint your nails with two coats of matte purple polish.
- Use a fine nail art brush or stickers to create black bat silhouettes on each nail.
- Finish with a matte top coat to maintain the matte effect.
FAQ
Q: How can I make my nail designs last longer? A: Always use a good quality base and top coat. Avoid using your nails as tools, and wear gloves when doing household chores.
Q: What are some quick tips for beginners? A: Start with simple designs and use tools like dotting tools and striping tape for precision. Practice makes perfect!
Q: Can I use regular nail polish for nail art? A: Yes, but using nail art-specific polishes and tools can make the process easier and the designs more precise.
By following these easy steps, you can create stunning fall nail designs at home, whether you prefer short and simple styles or bold and cute patterns. Happy nail painting!
Save Pin

URL Copied
